Guild and Community
Guild and Community
- Viewing Guild Info
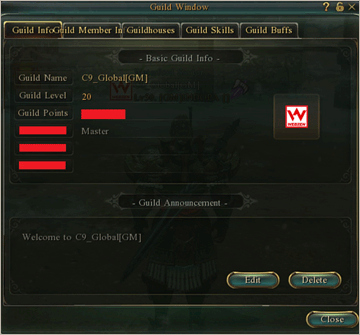
Talk to the Guild Manager in any village and click the Create Guild button to create a guild. Once you create or join a guild, you can view Guild Information by pressing Ctrl to open the Main Menu and click the Guild icon, or simply pressing U. You can check your guild members’ information by pressing [Members] tab at the top of the windows.

- Guild Points
Guild Points (GP) serve as a currency for guilds and can be used for various purposes, such as growing the guild or purchasing housing. Several activities reward players with GP, like Intrusion, Stage Clears, PvP, and Survival.
- Guild Level
Guild Masters can increase the Guild Level. Increasing the Guild Level consumes Guild Points, but it also increases your maximum member capacity and gives you access to more content.
- Guild Skill
Guild Skills provide buffs to all members of the guild. Talk to the Guild Manager in any town and click [Learn Guild Skills] button to learn a skill. Guild Masters may spend GP to learn Guild Skills, and guild members may only learn skills that have first been learned by the Guild Master.
- Guildhouse
Guilds can build guildhouses once they reach level 3. Guildhouses allow guild members to access the Guild Warehouse and configure Guild Skills/Buffs. If you are the Guild Master, you can build and manage a guildhouse on [Guildhouse] tab at the top of the Guild window.
- Guild Buff
Guild Buffs increase the stats of all build members. They are granted when certain Guildhouse decorations are present in the guildhouse.
- How to learn a Guild Buff?
1. Enter the guildhouse using the portal next to the Guild Manager in any town.
2. Click [Guild Buffs] to open the House Inventory window.
3. Double-click the decoration with the buff you want and click [Yes] when asked to confirm your choice.
- Guild Crest
Guild Crests appear next to your character name. You may choose a guild crest at Guild Lv.5. Guild Crests. The following formats are supported: BMP, JPG, TGA, DDS.
The image must be 32x32 pixels in size for BMP and JPG files, use 100% green (RGB color value of 0, 255, 0) to indicate transparent sections of the image. The image must be located in the “My Documents/C9/ImageFiles” directory.
- Viewing community Info
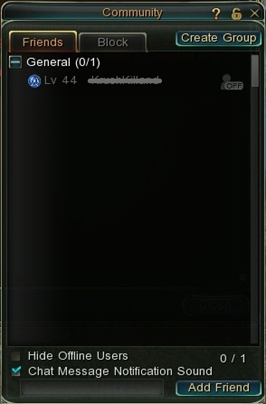
You can open the Community window by pressing Ctrl to open the Main Menu and click the Community icon or simply pressing O. You can add a friend by typing the name of a friend's character into the textbox and pressing [Add Friend] at the bottom.

- Deleting a Friend
1. Open the Community window.
2. Right-click the name of the character you wish to delete in the list.
3. Press [Delete Friend] button to remove the selected player.
- Blocking a User
1. Open the Community window.
2. Click [Block] tab at the top of the Community window.
3. Type or paste the character’s name into the textbox at the bottom.
4. Click [Block User] button to block the selected player.
- Unblocking a user
1. Open the Community window.
2. Click [Block] tab at the top of the Community window.
3. Right-click the name of the character you wish to unblock in the list.
4. Click [Unblock User] from the context list to unblock the player.
Chat System
- Chat Box

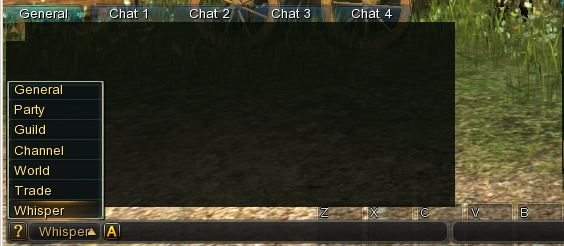
Press Enter to open a chat box. This allows you to enter messages that other players can see.
- Chat Commands

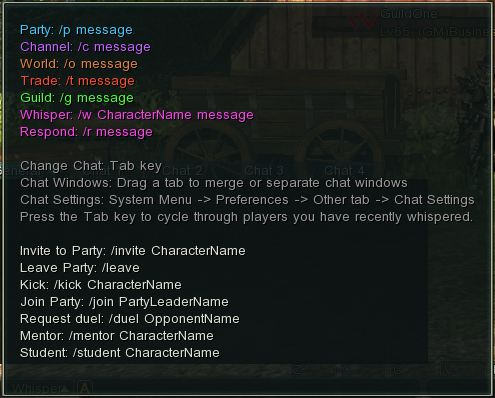
General Chat: A normal message that is visible to players near your characters
Party Chat: Sends a message to members of your party
Channel Chat: Sends a message to all of the players in your channel
World Chat: Sends a message to all of the players on your server
Trading Chat: Sends a message to advertise items you want to buy, sell, or trade
Guild Chat: Sends a message to members of your guild
Whisper Chat: Sends a private message to another player
Respond Chat: Sends a private message to the player you most recently whispered to
- Chat Window Preferences
Click the ? Icon on the lower left side of the chat window to configure the settings for that chat window. This allows you to change the number of visible chat windows and customize the look of each chat window.
- Emotes
/sit: Sit down
/lay: Lay down
/greet: greet nearby players
/laugh: Laugh out loud
/cry: Cry out loud
/angry: Get angry
/clap: Applaud
/cheer: Cheer on nearby friends
/nod: Nod your head
/shake: Shake your head
/thank: Express thanks
/frustrated: Express frustration
/arg!: Express your surprise
/lazy: Take a break from your adventure
/ask: Ponder about life
/confused: Express confusion
/embarrassed: Act embarrassed
/brag: Show off
/boo: Boo a bad performance
/love: Express love to someone
**Some emotes cannot be expressed by certain classes. (e.g. /lazy can only be used by Hunters)
Stamina

You need to spend a certain amount of Stamina to run dungeons. The amount of stamina to run a dungeon varies by the dungeon's level and difficulty. You can check your character's Stamina at the bottom of the screen.
- Normal Stamina
You get 150 Normal Stamina a day. If you use all your Normal Stamina for the day, you can start using this to continue gaming by using Reserve Stamina. Normal Stamina resets at 7AM UTC every day.
- Reserve Stamina
You get 250 Reserve Stamina a week. However, when you run out of both Normal and Reserve Stamina, you can no longer enter dungeons. Reserve Stamina resets on Saturday at 7AM UTC.
- Obtaining Stamina
You have several choices to obtain Stamina:
1. Wait for Reset
2. Use stamina Boosters which can be obtained from Survival
3. Purchase Premium Service Box from Cash Shop to get 100 additional Stamina for a day
Skill Combo
Combos can include a variety of skills. Here are basic controls and combos for each class.
- Fighter
Left-click: Primary attack with main-hand weapon
Left-click and hold: Primary attack chain
Right-click: Secondary attack with off-hand weapon
Right-click and hold: Secondary attack chain
- Basic Fighter Combos
1. Left-click x4, right-click x3, left-click and hold (for 4 hits), right-click and hold (for 3 hits)
2. Left-click x4, 1 (Bash hotkey)\n left-click and hold (for 4 hits), 1 (Bash hotkey)
- Advanced Fighter Combos
1. Bash I -> Press Kick -> Shield Bash
2. Bash I -> Upper Swing I
3. Backstep Thrust -> Press Kick -> Shield Bash -> Flank Attack
4. Thrust Kick -> Flank Attack
5. Bash I -> Bash II
6. Backstep Uppercut -> Upper Swing I -> Rising Attack.
- Hunter
Left-click: Primary attack with main-hand weapon
Left-click and hold: Primary attack chain
Right-click: Ranged attack with off-hand weapon
Right-click and hold: Charged attack chain
- Basic Hunter Combos
1. Left-click x4, right-click, left-click and hold (for 4 hits), right-click (Charged Arrow)
2. Left-click x4, 1 (Vital Thrust hotkey), left-click and hold (for 4 hits), 1 (Vital Thrust hotkey)
3. 1 (Vital Thrust hotkey), left-click x4, 1 (Vital Thrust hotkey), left-click and hold (for 4 hits)
- Advanced Hunter Combos
1. Evasive Maneuver -> Evasive Attack
2. Vital Thrust -> Dagger Expertise -> Charged Arrow
3. Turn Slash -> Lift Kick -> Charged Arrow
4. Grab Throw -> Flying Shatter Kick -> Charged Arrow
5. Eagle Kick -> Grab Throw -> Lift Kick -> Charged Arrow
6. Eagle Kick -> Turn Slash -> Bomber Shot
- Shaman
Left-click: Primary attack with weapon
Left-click and hold: Primary attack chain
Right-click: Secondary magic attack
Right-click and hold: Charged magic attack
- Basic Shaman Combos
1. Left-click x4, right-click (Mana Piece), left-click and hold (for 4 hits), right-click (Mana Shot)
2. Left-click x4, 1 (Ice Spear hotkey), left-click and hold (for 4 hits), 1 (Ice Spear hotkey)
- Advanced Shaman Combos
1. Dark Calling -> Spark Swing
2. Mana Shot -> Mana Missile -> Fireball
3. Dark Calling -> Spin Smash -> Vera Crasher
4. Dark Calling -> Mana Siphon -> Mana Missile
5. Spirit Chain -> Dark Calling -> Mindflame
- Witchblade
Left-click: Primary attack with main-hand weapon
Left-click and hold: Primary attack chain
Right-click: Secondary attack with off-hand weapon
Right-click and hold: Secondary attack chain
- Basic Witchblade Combos
1. Right-click and hold (for 4 hits)
2. Left-click x4, 1 (Helldive Burst hotkey), left-click and hold (for 4 hits), 1 (Helldive Burst hotkey)
- Advanced Witchblade Combos
1. Turning Kick -> Twisting Flip Kick
2. Turning Kick -> Viper Knee Kick -> Helldive Burst
3. Beauty Spin Kick -> Viper Knee Kick -> Cross Combination -> Helldive Burst
4. Fear Throw -> Dagger Stack
- Mystic
Left-click: Primary attack with main-hand weapon
Left-click and hold: Primary attack chain
Right-click: Secondary attack with off-hand weapon
- Basic Mystic Combos
1. Left-click x5
2. Left-click and hold for 5 hits
3. Left click x5, 1 (Tremor)
4. Left-click and hold for 5 hits, 1 (Tremor)
- Advanced Mystic Combos
Vertical Smash -> Gust Wind
Heavy Swing -> Double Swing
Tremor -> Tremor Combo -> Round Blast
Tremor -> Heavy Swing -> Round Blast
